
If your paint feels rough after a wash, or you're prepping for a ceramic coating or sealant, a standard shampoo isn't going to cut it. No matter how thorough your wash technique is, or how good your shampoo is, there's a whole category of contamination that soap and water simply can't touch. We're talking about iron particles from brake dust and industrial fallout that embed themselves into your clear coat, tar and road grime that bonds to the surface over time, and microscopic debris that builds up wash after wash without ever being fully removed.

Paint contamination runs deeper than surface dirt, and getting rid of it properly means understanding two very different tools: iron remover and clay bars. One works chemically, dissolving contaminants from within the paint without ever making contact. The other works mechanically, physically lifting and trapping what's left on the surface. Together, they form the foundation of proper paint decontamination. Using just one can mean that you're only doing half the job.
So which one do you use first? Do you need both? Here’s everything you need to know.
What Is Paint Contamination, Exactly?
Not all contamination is created equal. Your paint collects two broad types of nasties over time:
Embedded metallic particles — Brake dust and industrial fallout are constantly landing on your paint. These tiny iron particles penetrate the clear coat and bond chemically over time. You often can't see them, but they're there. Left untreated, they continue to oxidise beneath the surface, causing paint staining, accelerating clear coat degradation, and creating a rough, contaminated base that prevents waxes, sealants, and ceramic coatings from bonding properly.

Bonded surface contaminants — tar, tree sap, road grime, and other organic material that sticks to the surface and can’t be removed by washing alone.
The key point here: no single product removes both. That’s why a two-step decontamination process almost always gives the best result.
What Does an Iron Remover Do?
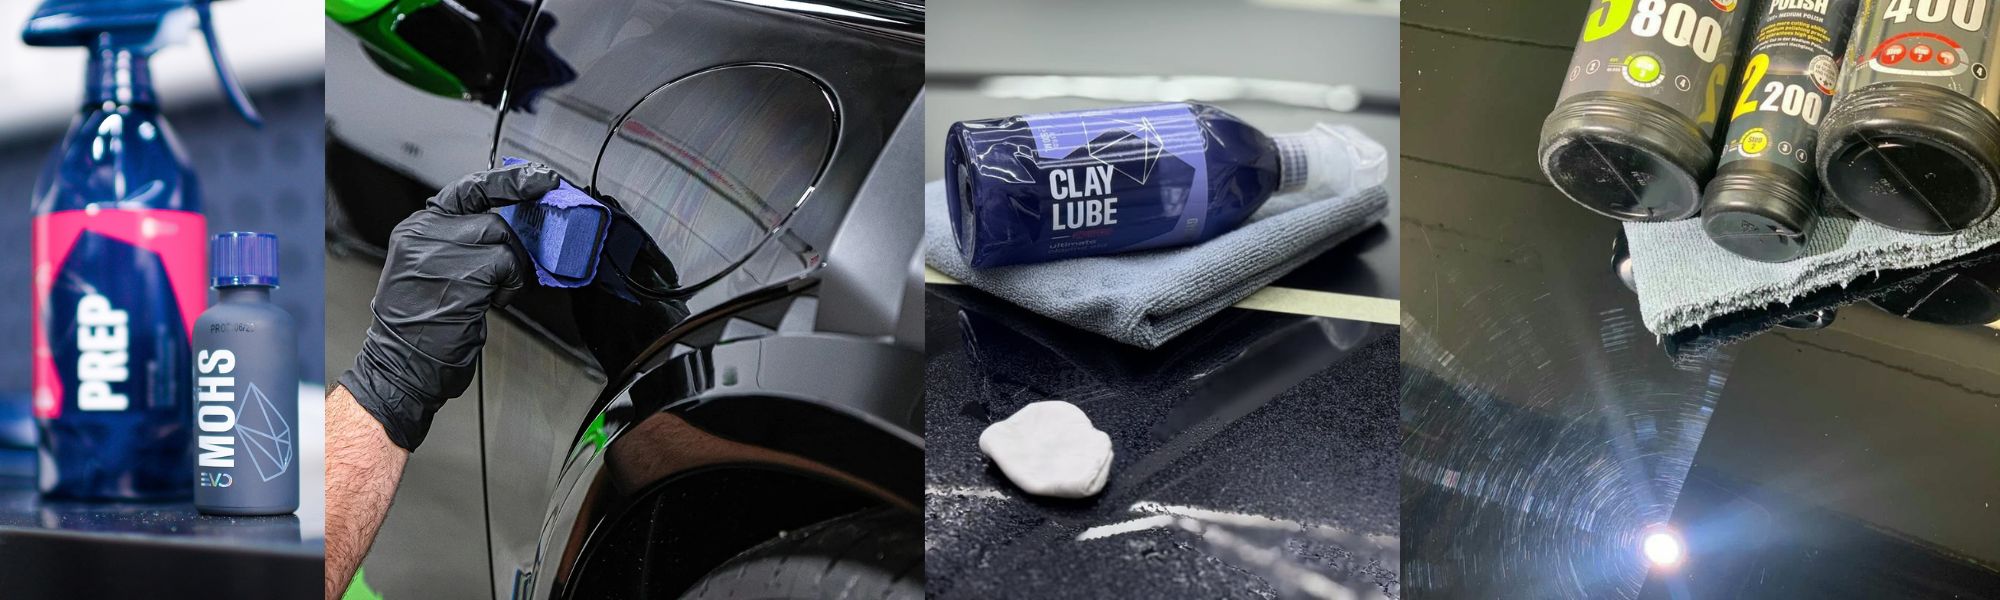
An iron remover is a chemical decontamination spray. You apply it to the paint, and it reacts with embedded iron particles, typically turning purple as it works, then gets rinsed away. No contact with the paint is required.
The big advantage? It reaches into the pores of the clear coat where clay simply can’t go. It’s also incredibly safe and straightforward to use, making it a solid option for DIY enthusiasts.
Two great options available at Car Care Products:
• Gyeon Q2M Iron Redefined — a high-performance iron remover that works effectively on both paint and wheels
• Dodo Juice Ferrous Dueller Iron Remover — a pH-balanced, colour-changing formula that’s gentle enough for regular use

What Does a Clay Bar Do?
A clay barring is mechanical decontamination. You glide it across a lubricated paint surface, and it physically lifts and traps bonded contaminants that washing, and even iron remover, can’t shift. The result is paint that feels noticeably smoother, almost like glass.
Clay requires a bit more care than iron remover. You need lubricant, a light touch, and a clean technique. But the payoff in surface feel and prep quality is real.
At Car Care Products, there are options to suit every level of contamination:
• Dodo Juice Gentle Grey Clay Bar 200g — a fine-grade bar ideal for regular maintenance
• Mint Clay Bar Fine — great for light contamination and well-maintained paint
• Gyeon Q2M Mild Clay Bar 100g — excellent for moderate contamination on a budget
• Gyeon Q2M Coarse Clay Bar 100g — for heavier contamination, though use with care to minimise the risk of marring
• Mint Clay Cloth — a reusable clay mitt that’s faster and more beginner-friendly than a traditional bar
Iron Remover vs Clay Bar: Key Differences
|
|
Iron Remover |
Clay Bar |
|
Method |
Chemical |
Mechanical |
|
Contact with paint |
None (touchless) |
Yes |
|
What it removes |
Embedded iron/metallic fallout |
Bonded surface contaminants |
|
Marring risk |
None |
Low to moderate (if misused) |
|
Ease of use |
Very easy |
Moderate |
|
When to use |
Before claying, or as standalone maintenance |
After iron remover, or for surface refinement |
Which Should Come First?
Iron remover always goes first. Here’s why:
When you clay your paint, you’re dragging a product across the surface. If there are sharp iron particles still embedded in the clear coat, you’re essentially dragging grit across the paint, increasing the risk of micro-scratches and marring.
Iron remover dissolves those particles chemically before you make any contact. It makes the subsequent clay process safer, easier, and more effective. The clay then handles everything the iron remover couldn’t: surface-bonded tar, sap, and grime.
Reversing the order doesn’t ruin everything, but it does undermine the whole point of decontaminating carefully.
Do You Need Both?
That depends on your situation:
Use iron remover only when:
- You’re doing a regular maintenance decontamination (every 3–6 months)
- Contamination is light
- Your vehicle is ceramic-coated and well-maintained
Use clay only when:
- You’re dealing with specific surface contaminants like tar spots or overspray
- Iron contamination has already been addressed
Use both when:
- Preparing for polishing, ceramic coating, or paint sealant
- The paint feels rough or gritty after washing
- The vehicle hasn’t been properly decontaminated in a long time
- You want the best possible surface before applying protection
For most enthusiasts, doing a full detail or pre-coating prep, using both is the right call every time.
New Car vs Daily Driver: Does It Change the Process?
New Cars
Brand new doesn’t mean contamination-free. New vehicles often pick up iron fallout during transport. Sitting on rail cars or ships exposes them to metallic particles before they even hit a showroom. The paint may feel smooth, but still be contaminated.
Recommended approach: Always use iron remover. Clay lightly and only if the paint actually feels rough.
Why it matters: Applying a ceramic coating or sealant over contaminated paint traps the problem underneath your protection.
Older and Daily Driven Cars
More road time means more buildup. Paint on a daily driver is typically rougher to the touch and has heavier iron contamination from brake dust.
Recommended approach: The full iron remover plus clay combination. Take your time and check your work.
Choosing the Right Clay Grade
Always start with the least aggressive option. Fine-grade clay removes lighter contamination with minimal risk; heavy-grade clay cuts through serious buildup but increases the chance of light marring.
• Fine grade (e.g. Dodo Juice Gentle Grey, Mint Clay Bar Fine, Gyeon Q2M Mild) — for regular maintenance and well-kept paint
• Coarse grade (e.g. Gyeon Q2M Coarse) — for neglected paint or heavy contamination, step up only if needed
If you're new to claying or want speed over precision, a Clay Cloth, like this one from Mint, is a great choice. Unlike a traditional clay bar, which needs to be folded and kneaded regularly to expose a clean surface, the clay cloth has a much larger working face, meaning you can cover a full door or bonnet panel in a fraction of the time. It can also attach to a wash mitt or can be used by hand, making it far more ergonomic for larger surfaces. And because it's a cloth rather than a malleable bar, there's no risk of dropping it and having to throw it away; it's fully reusable, just rinse it clean after each use.
That said, the clay cloth isn't always the right tool for the job. Its larger, less flexible surface makes it harder to work into tighter areas like door jambs, around badges, or along panel edges, where a traditional bar gives you much more control. It's also generally considered more aggressive than a fine-grade clay bar, so if your paint is in good condition and you're doing light maintenance decontamination, a gentler, fine-grade bar may be the safer choice to minimise any risk of marring.
Step-by-Step: The Full Decontamination Process
1. Pre-wash — Using a foam canon, foam and rinse you car to remove loose dirt
2. Contact wash — shampoo the car thoroughly, then rinse again
3. Apply iron remover — spray panel by panel, wait for the colour change, then rinse off completely (work in shade, don’t let it dry on the paint)
4. Clay bar — working one panel at a time, spray clay lube generously and glide the clay bar or mitt across the surface with light pressure. Use your claying hand to feel the paint as you go. You will notice a change in the smoothness of the paint, letting you know it is working.
For clay lube, Gyeon Q2M Clay Lube 500ml and Mint Clay Lube 500ml are both excellent — use plenty, never clay dry.
5. Final rinse or wipe down — remove any lube residue
6. Apply protection — this step is critical (see below)
Areas to pay extra attention to: lower doors, side skirts, rear bumper, tailgate, behind wheels, and the front bumper. These collect the most contamination.

Common Mistakes to Avoid
• Claying without lube — the fastest way to scratch your paint
• Skipping iron remover first — increases marring risk during claying
• Using too much pressure — let the clay do the work
• Reaching for coarse clay when fine will do — more aggressive isn’t always better
• Claying dirty paint — always wash first
• Using all of the Clay at once - Simply break a section of clay off the main bar, massage it in your hand to make it more malleable when using, and after each panel fold it into itself to expose clean clay for the next panel. Using small amounts of clay at a time helps extend the life of your clay and adds security, as it is best to throw out clay if it is dropped on the floor while detailing.
Do You Need to Polish After Claying?
Not always. If you used a fine clay with proper lubrication, the paint may be perfectly fine. But claying can introduce light marring, especially with a coarser grade or if the technique wasn’t ideal. Inspect the paint in good lighting or under a detailing light before deciding. If you’re going straight to ceramic coating, a light machine polish is good practice regardless.
Why You Must Protect After Claying
This one catches a lot of people off guard. Claying strips your existing protection — wax, sealant, whatever was on there is now gone. Your freshly decontaminated paint is completely exposed.
You need to apply protection immediately after decontamination. That means a paint sealant, carnauba wax, or, ideally, ceramic coating. Skipping this step leaves your now-clean paint vulnerable to contamination bonding straight back on, and you’ve lost the gloss and hydrophobic behaviour you worked for.
How Often Should You Decontaminate?
• Iron remover: Every 3–6 months, or whenever you notice heavy fallout
• Clay bar: Typically, when needed, i.e. when applying a new protective coating or polishing paint.
Quick Summary
|
Step |
Product |
When |
|
1. Wash |
Car shampoo |
Always first |
|
2. Iron decon |
Iron remover spray |
Before claying, every 3–6 months |
|
3. Clay |
Clay bar/mitt + lube |
When needed for pre-coating |
|
4. Protect |
Sealant, wax, or coating |
Immediately after claying |
Iron remover and clay bar aren’t competing products; they do different jobs. Together, they give you the cleanest, smoothest base possible before any paint protection goes on. Get the order right, use the right grade of clay, and always finish with protection.